How to Get Paid in USDT as a Freelancer—Even If You’ve Never Used Crypto
You’ve agreed on the work, the deadline and the price. Then your client asks: “Can I pay you in USDT?”
If you’ve never used crypto, that can feel like another job to learn before you can get paid for the first one.
Here’s the practical answer: you need a receiving account or wallet that supports USDT, the correct deposit network, and an agreement about how much should arrive. Before sharing an address, check how you’ll turn that payment into money you can use.
For freelancers, that last step matters. A payment method is useful only if it works for both the client sending the money and the person earning it.
First, agree on what “paid in USDT” means
USDT, also called Tether, is a stablecoin designed to track the US dollar. It is a crypto asset rather than a dollar bank balance, and its market price can vary.
If you quoted $300 for a project, clarify whether the client will send 300 USDT and whether that is the amount you should receive after their sending fees. Don’t leave that conversation until payment day.
You can keep the message simple:
“USDT works for me. Please confirm the payment will be 300 USDT received, with any sending fees covered on your side. I’ll send my receiving address and the supported network before payment.”
Also agree on the payment schedule. A deposit before work begins and a balance after an agreed milestone may suit a direct client relationship. The right arrangement depends on the project and your contract.
If you found the client through a freelance marketplace, follow its payment rules and protections.
Choose your receiving setup before sharing an address
There are two common options: a hosted platform account or a self-custody wallet.
A hosted account gives you a platform-managed wallet. You rely on the provider for custody and account access, and you must meet its verification and service requirements. A self-custody wallet puts you in charge of the keys and backups, as well as the network fees needed to move funds.
CoinCola is one hosted option to evaluate if you want to receive USDT and explore P2P selling afterward. Before accepting payment, check service availability for your country, the verification requested for your account, and whether suitable local cash-out offers are available.
Complete the required verification before a client sends money. Our explanation of KYC verification covers the basic idea; follow the current requirements shown in your account for the actual process.
Think of this as preparing your work tools. Your editor helps you deliver the project. Your receiving setup helps you collect the invoice. Both should be ready before the deadline.
The network must match on both sides
“USDT” identifies the asset. The network identifies the blockchain used to transfer it. Those are separate details.
CoinCola’s published support information lists USDT on Ethereum (ERC20) and TRON (TRC20). Check the live deposit screen before every payment: the network you select must also be supported by the client’s sending service. CoinCola Support
For example, if your deposit instructions specify USDT on TRON (TRC20), tell the client to use that exact asset and network. Don’t let them choose another network simply because its fee looks cheaper.
If the wallet terminology is unfamiliar, this guide to USDT TRC20 wallets and transfer fees explains the difference between holding USDT in a platform account and managing it yourself.
What to send your client
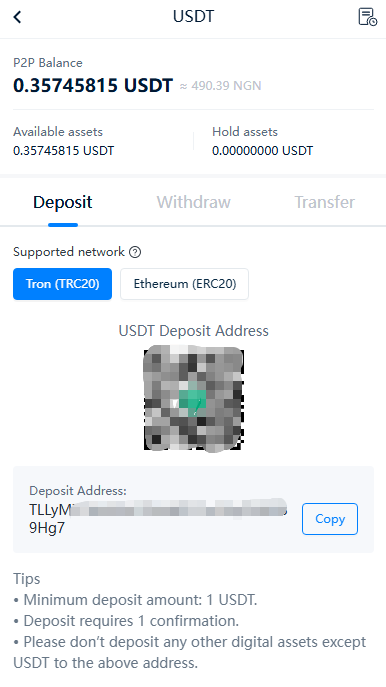
In your CoinCola account, open the wallet’s USDT deposit option, select an available supported network, and read the current deposit instructions. Copy the receiving address from that screen. Check any minimum deposit and any additional information the screen requires.
Then send a message like this:
Payment for: [Project or invoice number]
Asset: USDT (Tether)
Network: [Exact network shown on my deposit screen]
Receiving address: [Paste the complete address]
Amount to receive: [Agreed amount] USDTPlease confirm the network before sending and share the transaction hash afterward.
Send the address as copyable text. A QR code can be useful too, but the client still needs to confirm the network. Check the copied address against your deposit screen before sending it.
Your client does not need your password, login code, private key or recovery phrase. They may need recipient details requested by their sending provider for compliance, but those never include access to your account.
For a first payment, consider a small test if the deposit minimum and fees make it practical. Agree whether it forms part of the invoice total, and confirm receipt before the remainder is sent.
Your client says “sent.” Check your own account
A screenshot is useful context, but it is not confirmation that the payment reached your account.
Check your USDT deposit history and available balance. A transaction may need blockchain confirmations and platform processing before the funds become available.
If the payment is missing, ask for the transaction hash, also called a transaction ID or TXID. Compare the asset, network, destination address and amount with your instructions. If the blockchain shows delivery but your account has not been credited, contact official support with the transaction details.
Avoid asking the client to send the same payment again while the first transfer is being investigated.
Turning your USDT payment into local currency
Receiving USDT and receiving money in your bank are different steps. If you need local currency, plan the conversion before accepting the invoice payment.
On CoinCola, you can browse the USDT sell marketplace and select the relevant currency and payment method. Availability depends on your location, account eligibility and current offers. Compare the advertiser’s trading record, rate, amount limits and terms before opening an order.
For a bank-transfer P2P sale, follow the active order instructions and verify payment in your own bank account before releasing crypto. Keep communication and evidence inside the order, and use the dispute process if needed.
The escrow used for a P2P order applies to that trade. It does not protect your freelance contract or guarantee that a client will pay for your work.
Calculate what you actually earned
A 300 USDT invoice does not guarantee a bank payout worth exactly $300. Your result depends on the amount received, the conversion rate and any applicable costs.
Before accepting a payment method, review CoinCola’s current fees alongside the quote and conditions for your chosen route. A trading fee and the exchange rate are different parts of the calculation.
Keep a simple spreadsheet:
| What to record | Why it helps |
|---|---|
| Project and invoice amount | Connects the payment to the work |
| USDT received and transaction hash | Records what arrived |
| Conversion date and proceeds | Shows what the payment became |
| Payment costs and project expenses | Helps calculate your net income |
| Hours worked | Shows your actual hourly earnings |
Crypto payments may still create income and tax-reporting obligations where you live.
For example, if a project takes ten hours, compare your actual proceeds after payment costs and project expenses with those ten hours. That gives you a more useful basis for pricing the next job than the headline invoice amount alone.
Keep the payment process repeatable
Once you’ve completed a payment successfully, save your client-message template and income-tracking sheet. Continue getting your address and network instructions from the current deposit screen rather than relying on an old chat.
You don’t need to become a crypto trader to accept a USDT payment. You do need to know what you’re receiving, how it will arrive and how you’ll use it afterward.
If your next client asks to pay in USDT, prepare your CoinCola account, check the available receiving and cash-out options, and agree on the details before sending your address. That leaves you free to focus on the work you’re being paid to do.